The proposed project is a Raspberry Pi-based intrusion detection system that uses a passive infrared (PIR) sensor to detect motion and a Pi camera to take pictures. The images obtained are stored in Firebase, which is Google’s mobile platform that helps you quickly develop high-quality apps.
Any area (indoors or outdoors) can be put under observation and even a slight movement by any heat-radiating body, such as a human being or an animal like a cat or dog, can be detected. On detection, the sensor triggers the camera to capture an image of the area. This system for intrusion detection can be modified to capture wildlife photos, face recognition, or other such applications.
Without Firebase settings enabled, the captured images are by default saved in Raspberry Pi. Either way, the autogenerated name itself contains the time and date of the movement in the area under observation, thereby giving the added advantage for user verification of the zone of observation (and verification of the same against expected or unexpected trespassing) by checking the folder. The same can be accessed on the Firebase system on your Android/iOS device or via a web app.
| Intrusion Detection System | ||
| Bill of Material | ||
| Components | Quantity | Description |
| Raspberry Pi 3b+ | 1 | For programming |
| PIR sensor | 1 | Motion sensor |
| Pi cam | 1 | 5MP Pi camera |
| Jumper wire | 3 | Female-female jumper |
Python language is used for programming. Before coding, the configuration of Raspbian OS on Raspberry Pi is needed. You need to install the Pi camera library files to run this project on Raspberry Pi.
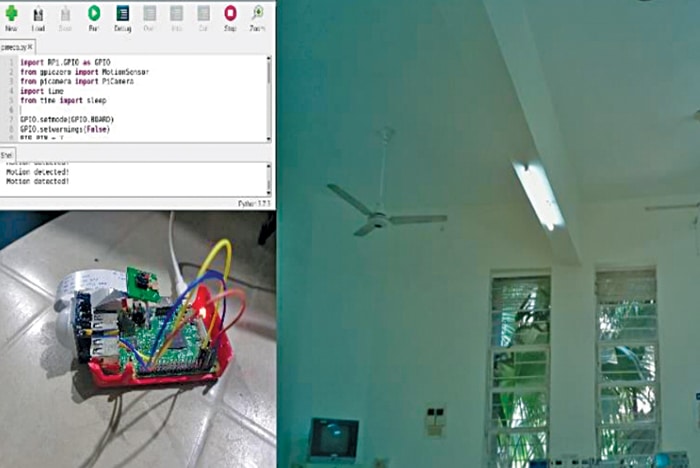
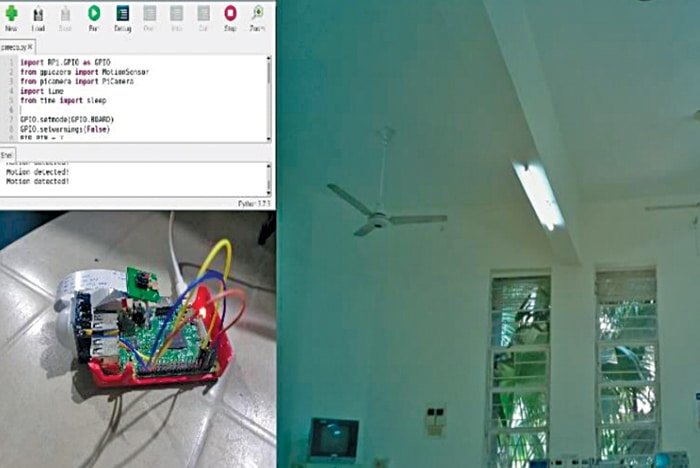
Fig. 1 shows the author’s prototype when the PIR sensor does not detect any movement.
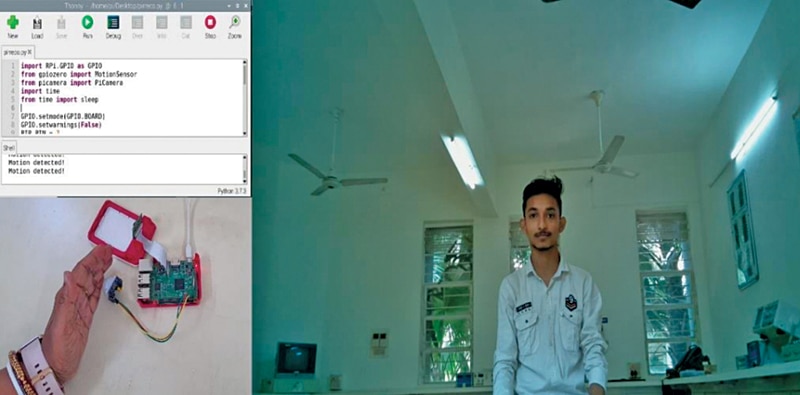
Fig. 2 shows the prototype when the sensor detects a small hand movement and activates the Pi camera to record the image. The image is captured and stored for reference. The components used in the project are listed in Table 1 for the Bill of Material.
Raspberry Pi – Installation and Setup
To use a Raspberry Pi camera (having a ribbon cable), first, enable the camera interface in the Raspberry Pi config setting. The following code is used for this part:
$ sudo apt-get install python-picamera
$ sudo apt-get installpython3-picamera
Then follow the step-by-step instructions given below.
Step 1: Enable Raspberry Pi camera software before using the camera module. In the desktop environment, first, go to Menu and select Preferences→Raspberry Pi Configuration.
| Pin Connections Between PIR Sensor and Raspberry Pi | ||
| Board Label | Pin Function (PIR) | Raspberry Pi |
| GND | Ground | GND |
| 5V | 5V power input | 5V |
| OUT | Output of the sensor | Pin 7 (GPIO 4) |
Select the Interfaces tab and Enable the camera.
Step 2: After successfully completing Step 1, update the software by running the following Linux commands in the Linux terminal:
$ sudo apt-get update
$ sudo apt-get upgrade
Step 3: After the software update, reboot the system.
Step 4: After reboot, write the code in Python3/ThonnyIDE for working of the project.
Intrusion Detection System – Circuit and Working
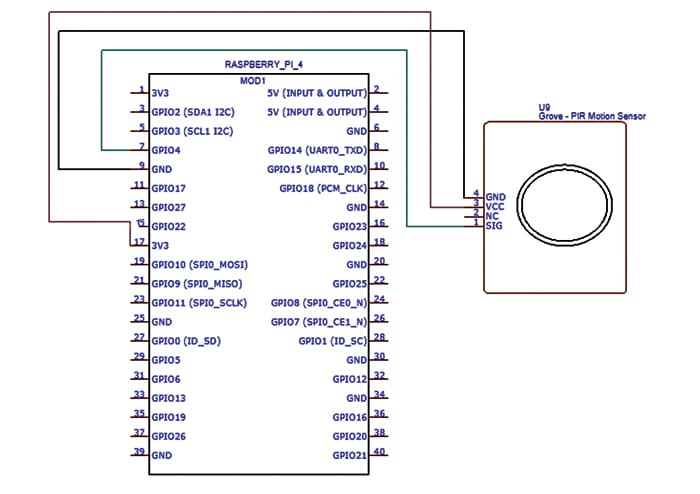
The circuit is quite simple, as shown in Fig. 3 for the circuit diagram. Refer to Table 2 for the connections between the PIR sensor and the Raspberry Pi board.
Test the code of the Pi camera in the terminal by running the command below for 5 seconds. This ensures that motion is detected. Refer to Fig. 4 for the testing code of the Pi camera in the terminal.
raspistill -o test.jpg
Also check: Interesting Robotics Projects
How to Use Google Firebase for Image Storage
As we know, the memory storage requirement of each clicked image is large. Hence, store the images in Firebase, which is a set of hosting services for any type of application. It offers NoSQL, real-time hosting of databases, content, social authentication, and notifications, or services such as a real-time communication server.
Following are the stepwise instructions for new users:
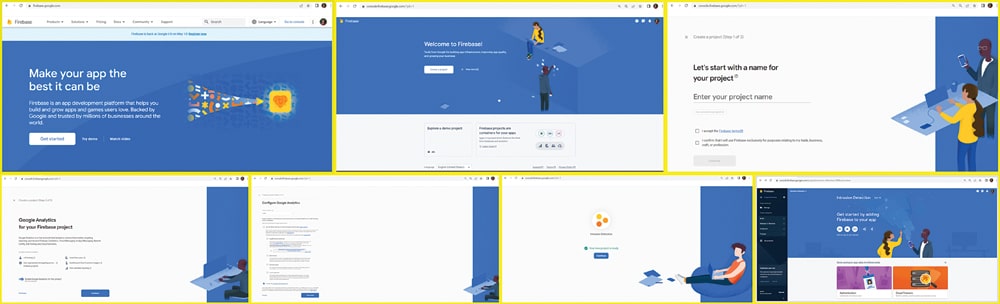
1. Open the Firebase official website.
A Firebase project is a container for your Apple, Android, and Web apps. Apps in this project will share features like Database, User Management, and Remote Configuration. A Firebase project is a cloud project. When you create a new Firebase project in the Firebase console, you are actually creating a Google Cloud project behind the scenes.
2. Click on the Get Started buttonwhich will lead to the project console
Click on Create a Project button and create a project. Give a name to the project; here the given project name is Intrusion Detection. Accept the terms of Firebase and press the Continue button.
3. Configure Google Analyticswhich is a free and unlimited analytics solution that enables targeting, reporting, and more in Firebase Crashlytics, Cloud Messaging, In-App Messaging, Remote Configuration, A/B Testing, and Cloud Functions. To activate it, click on Enable Google Analytics and then on the Continue button.
Enter Analytics location—the country/region of your organization. This does not affect where Google may process and store Customer Data for Firebase. (Data sharing settings: The author didn’t opt for the default settings for sharing Google Analytics Data.) Accept the Google Analytics terms and move on to Create a Project button.
4. Your new project is ready. Press the Continue button; your project name should appear on the screen now. The sidebar provides various choices related to your project. Select Build, select Storage, and select Get Started.
See Fig. 5 for the screenshots of the vital steps mentioned above.
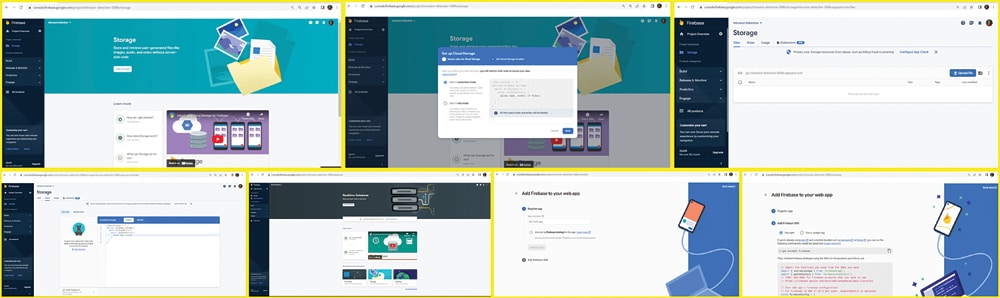
5. The author preferred to start in production mode. To do so, press the button Next and enter Cloud Storage Location. (After you set this location, it cannot be changed later. This location will also be the default location for Cloud Firestore. The author selected Asia South1.) This will lead to creating a default bucket.
6. In Storage, go to Rules, and select Edit Rules. We need read and write access in all possible conditions, so in the program on the right-hand side window, we have to delete “: if false” and click on the button Publish.
7. Go to Build and select Real-Time Database. Click on the button ‘Create Database’ and opt for Start in test mode. Your data is open by default to enable a quick setup. However, you must update your security rules within 30 days to enable long-term client read/write access to ensure Third Party Allowance.
Click on the button Enable. This should provide you with a link to your project database. For example, the link for the author’s project was: https://console.firebase.google.com/project/intrusion-detection-4339c/database/intrusion detection-4339c-default-rtdb/data/~2F
8. Go to Project Overview. This will add an app to get started. You will have a choice to select from Android, iOS, and Web App. (The author opted for Web App.) To ensure web-based access to the project details, select the button ‘Web’.
9. Register the app by entering the name of Project Intrusion Detection System in the space to enter App Nickname. Select the button Register App.
10. Go to the button Add Firebase SDK and select the button Use npm (https://www.npmjs.com)
We now need authentication details in terms of JS SDK, that is your web app’s Firebase configuration apiKey, which must include the following details:
authDomain:
databaseURL:
projectId:
storageBucket:
messagingSenderId:
appId:
measurementId:
Remember these details are unique to you and be careful about sharing them with anyone. For Firebase JS SDK v7.20.0 and later, measurementId is optional.
These details are to be included in the Raspberry Pi program for authentication and further processing. Click on Continue to Console. Fig. 6 shows screenshots of Steps 5 onwards of your project.
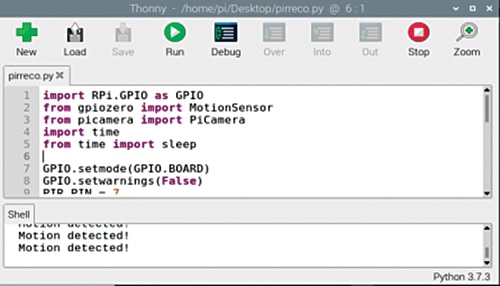
Now create the Python program where you need to fill in the credentials of Firebase you noted earlier. Create the while loop to check the PIR motion sensor. When motion is detected, it will store the picture in Firebase. Fig. 7 shows the code’s snippet to set Firebase credentials.

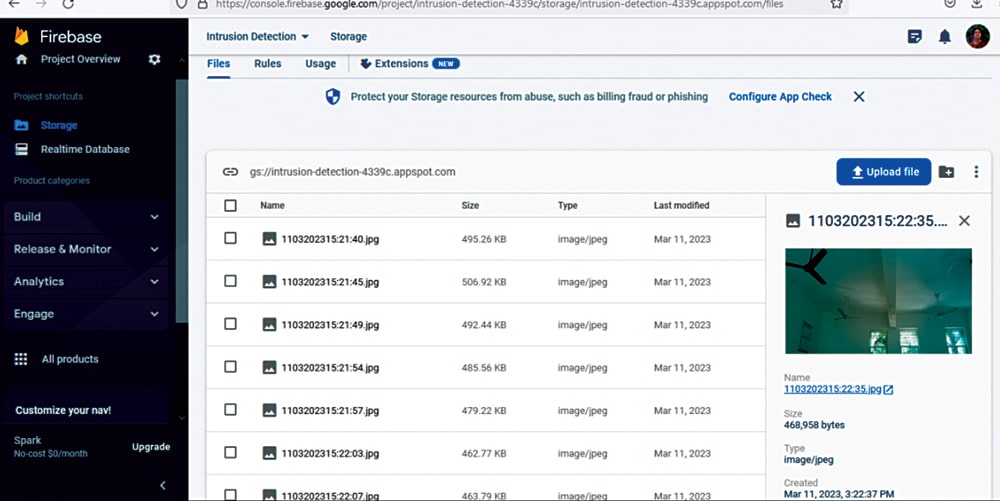
If all the above-mentioned steps are taken correctly, you should be able to obtain all the PIR sensed images, as shown in Fig. 8.
Download Source Code
Dr. Geethali Saha is associated with the Department of Electronics and Communication, GCET, Anand, Gujarat. Under her guidance Premal Talpada, student in 3rd year IT Engg Dept has successfully implemented this project